How to Fix a Leaky Faucet
A dripping tap may seem like a small problem, but it can quickly become a bigger issue. Read on from the trusted experts at Roto-Rooter on how to fix a leaky faucet.
Want to get rid of that annoying, drip, drip, drip of your faucet? Good news: There are ways you can do this yourself. According to the U.S. Geological Survey's drip calculator, if one dripping or leaky faucet in your home releases 10 drips per minute, you'll be losing over 300 gallons of water a year. Don't let something as small as a leaky faucet make you spend more money than you need to. Instead, gauge whether you can fix the problem yourself or if you need to call in a plumber. Here are a few quick ways to fix the problem:
TABLE OF CONTENTS
- STEP 1 - ASSEMBLE THE TOOLS YOU'LL NEED
- STEP 2 - SHUT OFF THE WATER
- STEP 3 - REPLACE BROKEN OR LOOSE PARTS
- STEP 4 - REPLACE YOUR FAUCET
STEPS TO REPAIR A DRIPPING FAUCET
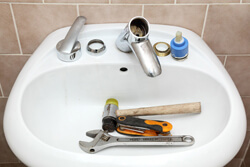
STEP 1 - ASSEMBLE THE TOOLS YOU'LL NEED
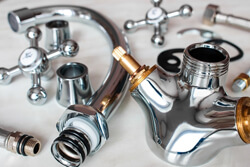
To take on the job yourself, you'll first need to gather all the supplies necessary to fix your leaky faucet. Normally, a leak is caused when the washer or seat assembly needs to be replaced, as the faucet then cannot create a seal strong enough to counteract the water pressure. You will most likely need a flat-head screwdriver, an adjustable wrench, replacement washers and O-rings, and penetrating oil like WD-40. These items are easy to find at a local hardware store and are relatively inexpensive to keep on-hand for future projects.
STEP 2 - DON'T FORGET TO SHUT OFF THE WATER
Once you have your tools at your side, you can't just start disassembling your faucet, there's one more thing to do first: Turn off the water! We've all seen movies and heard horror stories where water from sinks start spraying all over the room when the faucet is taken apart. This is probably one of the easiest, and worst, mistakes to make in this project, as now you not only have a leaky faucet, but you're also at risk of dealing with water damage.
The water should be completely off from the sink handles to the knobs controlling the main line. This step is crucial to completely the job quickly and without getting wet. If your shut-off valves are stuck, Roto-Rooter offers helpful videos to assist you in addressing the stuck valves yourself.
STEP 3 - REPLACE BROKEN OR LOOSE PARTS
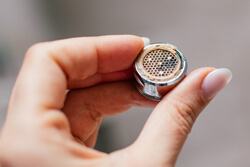
- CLEANING THE AERATOR
A dirty aerator could also be the culprit when trying to identify the source of a leaky bathroom or kitchen faucet. Examine the aerator to see if there are any particles surrounding it. Remove any particles on the aerator to see if the leak is repaired. Remember to also firmly tighten the nozzle in the event it might be loose.
- REPLACING THE WASHER/SEAL
When you turn the faucet off, a washer falls into place that sits against the faucet seat and completely seals off the flow of water. If for any reason that washer moves it can result in drips and leaks. Usually, taking apart a faucet and repositioning the washer will do the trick. If the leak has been going on too long, you may need to replace the washer and seat altogether.
Upon disassembling the faucet head, look at the washer and make sure that it fits perfectly back into its original position. If for some reason you find that it is warped, take the entire head in to a local Roto-Rooter or hardware store and find a new washer. Only a perfect match will work. Also, when replacing the washer, make sure that it is material that can handle both hot and cold water. If not, your new washer will warp again and lead to the same problem if not worse in the not too distant future.
- REPLACING THE O-RING
In many faucets, including cartridge and compression models, O-rings are installed within the handles to create a waterproof seal. When the O-rings become damaged or loose, that seal can break, causing a leak near the handle. If you have a leaking handle, try replacing the O-ring first - just make sure you buy the right size or the new part will be just as non-functional as the old one.
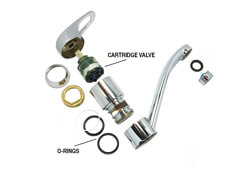
- REPLACING THE CARTRIDGE
Cartridge faucets can have one or two handles, so they're most easily distinguishable by how they feel to operate - turning the handle or handles is a bit smoother and easier than a compression or ball faucet. When cartridge faucets are dripping, it's often necessary to replace the entire cartridge valve within them. New cartridges cost about $10-15, depending on where you live, and they are relatively easy to install.
You can either record your removal process, or simply set the objects aside in the order that they were taken. This will also help ensure that you put the faucet back correctly without introducing new problems in the process. Replace the washer and O-ring, as these are likely the source of your issue. These should be an exact fit into your valve seat. Once these are in place, rebuild your faucet and admire your handiwork.
STEP 4 - REPLACE YOUR FAUCET
If your leaky-faucet problem persists after trying the quick fixes above, it may be time to purchase a new fixture altogether. Faucets experience a lot of wear and tear over time, especially the ones found in your kitchen or bathroom. Buying a new one will solve your problem. And if you decide to buy a new one, consider the many new options available to you, including hands-free faucets for the home.
CALL A PLUMBING PROFESSIONAL
Sometimes, the issue might be out of your hands. If your faucet isn't old, and you've tried fixing it, it could be a larger issue with your plumbing. Don't hesitate to call Roto-Rooter. We'll send a professional and experienced plumber to take care of your faucet repair.